Streamdog is a native Windows app that will imitate your clicks and keystrokes in real time, bringing some life to your stream or recording. It is an ideal companion for those who don’t want to use a camera or would like to hide some part of their screen with a dynamic element. In this blog post we’ll explore the technologies used behind the scenes.

Table of Contents
- Tech Stack
- Creating a Basic Tauri & React App Template
- Project Structure
- Tauri Backend Setup & Listening to Events
- Interaction between Tauri and React
- How Streamdog Works
- Conclusion
Tech Stack
Streamdog is built using Tauri and React. I was already familiar with React and looked for a way to leverage my existing knowledge for building a native app. At this point I considered Tauri and Electron, and decided to go with the former which is the newer and more lightweight option. Tauri has proven to be very easy to use and work with. The developer experience just feels great.
Creating a Basic Tauri & React App Template
Tauri has an excellent Getting Started guide which will explain everything you need to set up a basic project. Assuming you have installed the prerequisites listed in the guide, the easiest way to create a new Tauri app is through npm, which you will anyway need to build the UI.
npm create tauri-app@latest
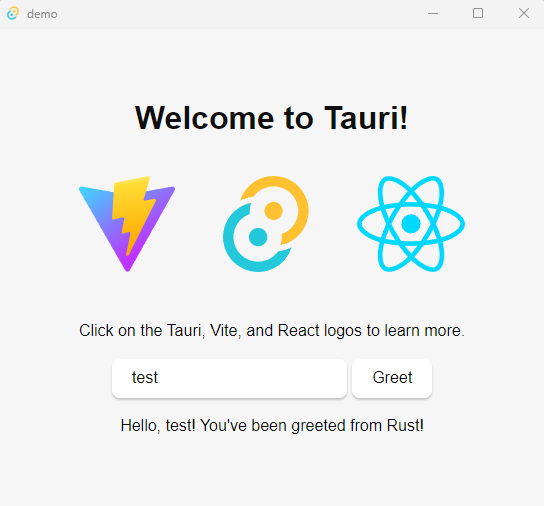
This command will provide you with many choices for tools and frameworks, feel free to choose the ones you are the most comfortable with. In the example below a React-Tauri app is generated.
  Need to install the following packages:
  [email protected]
  Ok to proceed? (y) y
  ✔ Project name · demo
  ✔ Choose which language to use for your frontend · TypeScript / JavaScript - (pnpm, yarn, npm, bun)
  ✔ Choose your package manager · npm
  ? Choose your UI template ›
    Vanilla
    Vue
    Svelte
  ❯ React  (https://react.dev/)
    Solid
    Angular
    Preact
Once your template is created, simply go ahead and launch it, it can’t get any simpler than that! These commands will download all necessary dependencies and build the native app, which will launch right after that.
  cd demo
  npm install
  npm run tauri dev
Project Structure
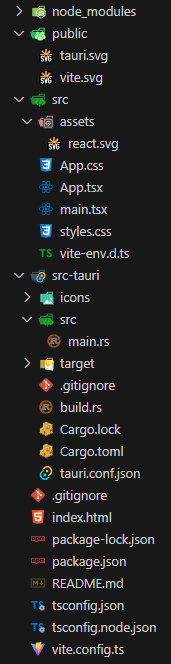
This is the folder structure right after executing the commands above. Let's explore the items one by one:
- node_modules: all installed dependencies declared in package.json
- public: resources used in your app, such as images, unprocessed by the framework
- src: React / UI code and resources
- /assets: resources to be used by React, can be optimized by the framework
- src-tauri: Tauri / Backend code and resources
- /icons: used as native application icons
- /src: Rust / Backend code
- /target: build artifacts are stored here
Some important files:
- src-tauri/src/main.rs: Tauri is bootstrapped here. Here is where you can create additional backend components and commands for the frontend to call, emit events, handle callbacks and so on.
- src-tauri/tauri.conf.json: Tauri configuration properties are here, including feature flags, window and security options
- src-tauri/cargo.toml: Rust dependencies are declared here, including Tauri
- package.json: npm dependencies are declared here, including React
Tauri Backend Setup & Listening to Events
The main feature of Streamdog is to imitate your clicks and keystrokes in real time. To listen to these events, I used a Rust library called rdev. I added the dependency in Cargo.toml and then created event listeners in main.rs that immediately re-emit the event to the frontend. Here is how I did this:
  ...
  fn spawn_event_listener(app: AppHandle) {
      tauri::async_runtime::spawn(async { rdev::listen(get_callback(app)).unwrap() });
  }

  fn get_callback(app: AppHandle) -> impl FnMut(Event) {
    return move |event: Event| match event.event_type {
        EventType::MouseMove { x, y } => {
            app.emit_all("MouseMove", [x, y]).unwrap();
        }
        EventType::KeyPress(key) => {
            app.emit_all("KeyPress", get_key_press_payload(key, event))
                .unwrap();
        }
        EventType::KeyRelease(key) => {
            app.emit_all("KeyRelease", get_key_press_payload(key, event))
                .unwrap();
        }
        EventType::ButtonPress(_button) => {
            app.emit_all("ButtonPress", true).unwrap();
        }
        EventType::ButtonRelease(_button) => {
            app.emit_all("ButtonRelease", true).unwrap();
        }
        _ => {}
    };
  }
  ...
To plug this into Tauri, you need to modify the main Builder method chain. In the following piece of code you can see a couple unrelated features. I am using the tauri_plugin_fs_watch plugin to watch for file changes and reload the app in case a Streamdog skin was modified. Also I am exposing the (get_display_size) command for the frontend to invoke.
fn main() {
    tauri::Builder::default()
        .device_event_filter(tauri::DeviceEventFilter::Always)
        .setup(|app| {
            spawn_event_listener(app.app_handle());
            Ok(())
        })
        .invoke_handler(tauri::generate_handler![get_display_size])
        .plugin(tauri_plugin_fs_watch::init())
        .run(tauri::generate_context!())
        .expect("error while running tauri application");
}

#[tauri::command]
fn get_display_size() -> (u64, u64) {
    return rdev::display_size().unwrap();
}
This is more or less the complete setup of the Tauri and Rust backend. Short and sweet.
Interaction between Tauri and React
On the frontend side, we can take advantage of APIs provided by Tauri to invoke backend commands, or listen to events. The following snippets are such examples.
import { invoke } from "@tauri-apps/api";

export function loadDisplaySize(): Promise<number[]> {
    return invoke('get_display_size');
}
import { listen } from '@tauri-apps/api/event';

export default function Mouse() {
  ...
  useEffect(() => {
    const unlistenPromise = listen('MouseMove', event => onMouseMove(event.payload as number[]));
    return () => {
      unlistenPromise.then(unlisten => unlisten());
    }
  }, []);
}
Make sure you unregister listeners when React components are unmounted! The Tauri APIs typically will return a function that does exactly that when invoked.
How Streamdog Works
With the mouse and keyboard events exposed to the frontend, it’s only a matter of consuming them and calculating positions and angles for the movement of the arms and other visual effects. The frontend of Streamdog is structured in components according to responsibility, such as Mouse, Keyboard, DropArea and so on. Each component listens to the events it needs and reacts accordingly.
Another crucial feature of Streamdog is skins support. Using Tauri APIs we are able to natively read and write to the file system, where the skins and config files are stored. Also, skin changes are immediately reflected on screen by watching for file system modifications.
Streamdog is built and released for Windows because that is the main use case - to be used along with gaming and streaming. However, there is nothing blocking it from being available on any other Tauri supported platform.
Conclusion
By leveraging Tauri and React I was able to build Streamdog in a very short time frame while also learning new technologies and techniques. The developer experience is smooth and the feedback cycle is short enough to maintain your flow state. Using richer frameworks such as Next.js instead of plain React would also be a great option in case a full-blown application is required.